Setting Up A Composite Ethernet/Audio USB Gadget
In my last post I wrote about setting up a Linux Ethernet gadget on a Raspberry Pi Zero. However, this was really just a proof of concept, to make sure I could do it. What I really need for my current project is a gadget that can deliver audio from an on-board sound card with an Ethernet interface for control.
Before starting, I should mention that I’m using an Ubuntu 16.04 system and the June 2019 version of Raspbian Buster on the Pi Zero. Therefore, the descriptions below are necessarily Linux centric. I’m not sure what issues you might run into with a Windows system.
A Soundcard for the Pi Zero
For the soundcard I chose the Fe-Pi Audio Z V2. This card uses the SGTL5000 stereo codec, the same one used on the Teensy Audio Shield. Solder some headers on the Pi Zero and sound card, connect them, configure the sound card as described on the Fe-Pi Audio documentation page, and it’s ready.
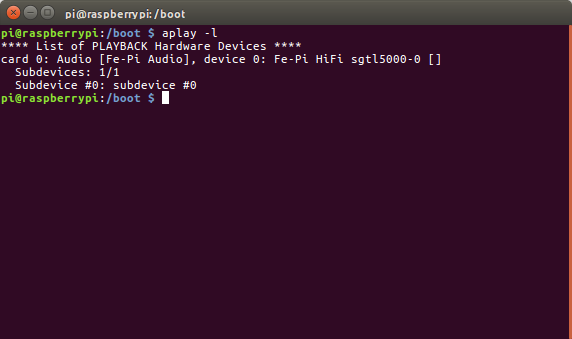
To check the sound card, log into the Pi Zero via SSH and execute the command
$ aplay -l
The Fe-Pi Audio should be listed as the only card available.
Then plug some headphones into the soundcard and execute the command
$ speaker-test -c 2 -t sine -f 500
You should hear a 500 Hz tone that alternates between the left and right channels.
Using Configfs to set up a Composite Linux Gadget
Configfs is a virtual file system used to configure and manage kernel objects from user space. For our purposes, it provides an alternate way to create and configure a Linux gadget.
Andrew Nicolaou has an excellent post on using configfs to set up a composite gadget. Using his instructions and the script below I was quickly able to create a composite gadget exposing both Ethernet and an audio interface.
#!/bin/sh

# Load libcomposite
modprobe libcomposite

# Create a gadget called usb-gadgets
cd /sys/kernel/config/usb_gadget/
mkdir -p usb-gadgets
cd usb-gadgets

# Configure our gadget details
echo 0x1d6b > idVendor # Linux Foundation
echo 0x0104 > idProduct # Multifunction Composite Gadget
echo 0x0100 > bcdDevice # v1.0.0
echo 0x0200 > bcdUSB # USB2
mkdir -p strings/0x409
echo "0123456789abcdef" > strings/0x409/serialnumber
echo "Pi Zero USB Gadget" > strings/0x409/manufacturer
echo "Pi Zero USB Gadget" > strings/0x409/product
mkdir -p configs/c.1/strings/0x409
echo "Config 1: ECM network" > configs/c.1/strings/0x409/configuration
echo 250 > configs/c.1/MaxPower

# Ethernet gadget
mkdir -p functions/ecm.usb0
# first byte of address must be even
HOST="32:70:05:18:ff:7a" # "HostPC"
SELF="32:70:05:18:ff:7b" # "Ethernet Gadget"
echo $HOST > functions/ecm.usb0/host_addr
echo $SELF > functions/ecm.usb0/dev_addr
ln -s functions/ecm.usb0 configs/c.1/

# UAC2 (audio) gadget
mkdir -p functions/uac2.usb0
ln -s functions/uac2.usb0 configs/c.1

# End functions
ls /sys/class/udc > UDC
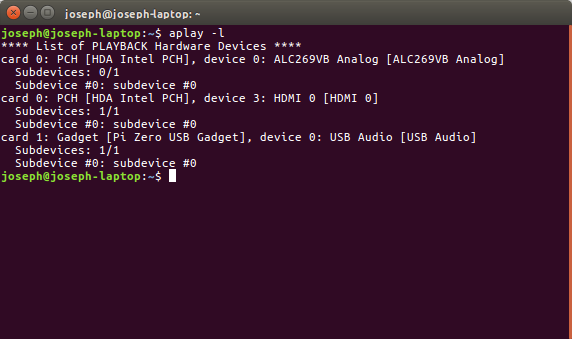
To test the gadget, plug it into a Linux system and execute the command
$ aplay -l
The gadget should show up as one of the available audio interfaces.
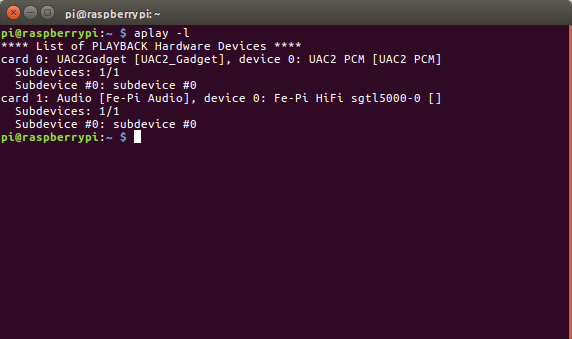
Now log into the Pi Zero and execute the same command. Again, the gadget should show up as one of the available audio interfaces.
While still logged into the Pi Zero, execute the command
$ aplay -L
to get a full list of available sound devices.
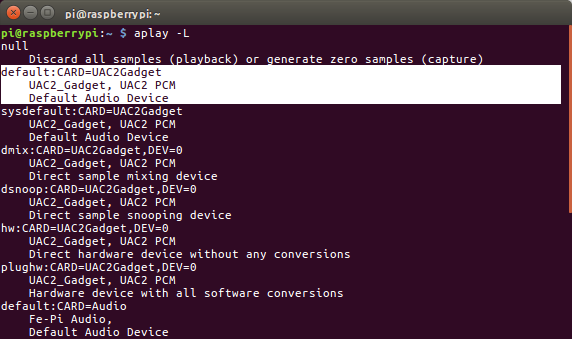
Identify the device associated with the audio gadget and execute the command
$ speaker-test -Ddefault:UAC2Gadget
replacing the -D parameter with the appropriate entry from the list of available sound devices. Open the Sound utility on the Linux system, select the Input tab, and Record sound from the Composite Gadget.

If all is well, the input level will vary as the sound from the Pi Zero comes in from the audio gadget.
Connecting the Two
So now we have Pi Zero with sound card and audio gadget interface. However, the two still need to be connected to deliver audio from the soundcard through the gadget interface. This can be done using Alastair Tse’s ALSA audio pipe.
On the Pi Zero, install python-alsasound 0.8.2
$ cd ~
 $ sudo apt-get install python-dev libasound2-dev
 $ git clone https://github.com/larsimmisch/pyalsaaudio
 $ cd pyalsaaudio
 $ python setup.py build
 $ sudo python setup.py install
Then navigate to the home directory and clone the audio pipe repo
$ cd ~
 $ git clone https://github.com/liquidx/alsa-audio-pipe.git
 $ cd alsa-audio-pipe
To test it, plug a microphone into the Pi Zero soundcard and execute the command
$ ./alsa_audio_piper.py --input input_hardware \
      --output output_hardware --floor-noise 0
where input_hardware and output_hardware are the soundcard and gadget as listed previously in the aplay -L command results. In my case, the command was
$ ./alsa_audio_piper.py --input default:Audio \
      --output default:UAC2Gadget --floor-noise 0
Now if you go back to the Linux system Sound utility as described above when testing the gadget, you should see the sound levels change when you speak into the microphone.
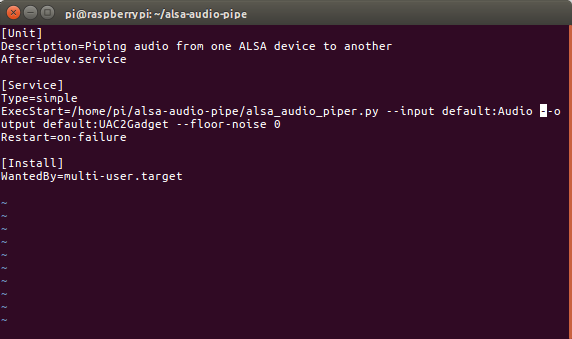
The audio pipe can be configured to start on boot the same way as was done for the gadget. Open the file alsa-audio-pipe.service in an editor and change the command parameters after ExecStart to match those used in the alsa_audio_piper.py command above
Close the file and create the service
$ sudo cp alsa-audio-pipe.service /etc/systemd/system
 $ sudo systemctl daemon-reload
 $ sudo systemctl enable alsa-audio-pipe
Then reboot the Pi Zero. Once reboot is complete the gadget can be tested in the same manner as above.
- Posted in: Uncategorized
- Tagged: Linux
